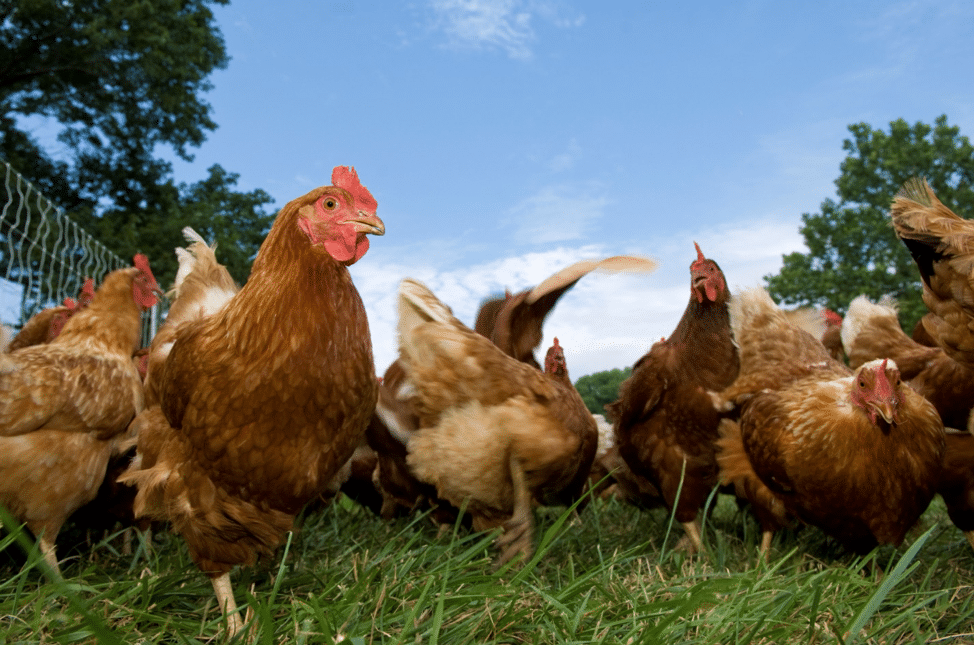
Recent outbreak of avian bird flu virus A in the U.S. poultry population has seen over 53 million chickens culled in the State of Iowa alone thus far in 2022. On the East Coast small poultry farmers and homesteaders such as the Monroe County Marsala family in Upstate NY, have also seen their flocks destroyed as a result of the virus. Their cry on You Tube, It’s Real, Cover Your Birds!
Many chicken keepers love to allow their chickens free range access, where their appetite for pecking on pesky bugs, scavenging and scratching around the yard as they fancy for food to eat is part of a healthy lifestyle for the poultry. When chickens remain in an enclosed space there are both advantages and disadvantages to consider, but the change in lifestyle might be something to seriously consider if your chickens are the ‘out on the town’ variety. Knowing how to protect chickens from bird flu is a great step to saving your flocks. Here’s why:
According to the CDC, unless humans come into direct contact with a chicken carrying chicken flu the risks of human contagion are low. Understanding how chickens become infected with the virus is key to avian flu precautions. U Here’s what the CDC explains
“Wild water birds (like ducks and geese) can be infected with avian (bird) influenza (flu) viruses, but usually do not get sick. Infected birds have virus in their saliva, mucous and droppings (feces). Bird flu viruses can spread easily between birds. Some of these viruses can cause serious illness and death in domestic poultry (like chickens, ducks, and turkeys).
Domesticated birds (chickens, turkeys, ducks, etc.) can become infected with bird flu A viruses through direct contact with infected waterfowl or other infected poultry, or through contact with surfaces that have been contaminated with the viruses. Bird Flu is a serious poultry disease and requires rapid response because it is highly contagious and can be fatal to chickens. Animal and Plant Health Inspection Service (APHIS) works with its federal, state, local and industry partners to quickly respond to any bird flu findings. Bird flu A(H5) or A(H7) virus outbreaks in poultry, where depopulation (or culling, also called “stamping out”) of infected flocks is usually carried out.
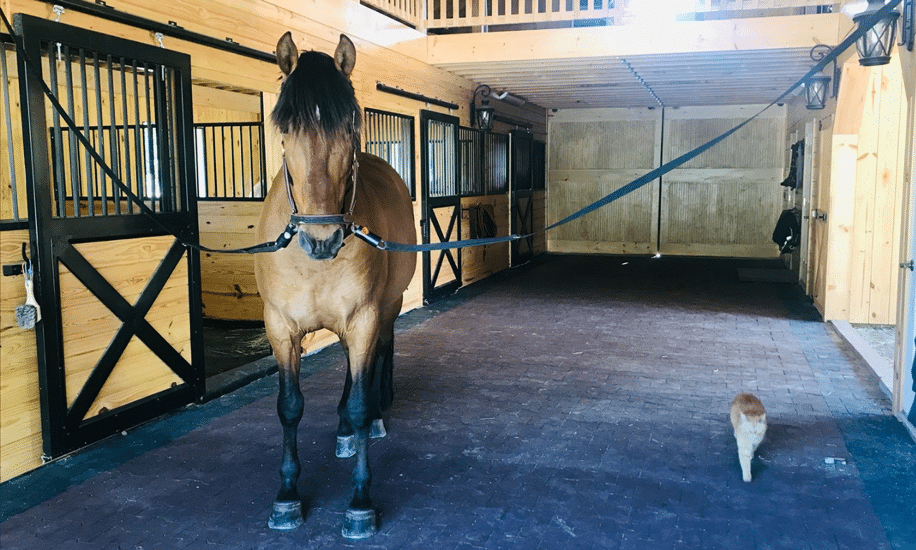
Provision of a covered chicken run or space adjoining the coop can mitigate the risk of the poultry running ‘afowl’ of infected feces/droppings or mucous surfaces where infected wildlife has brought the virus to roost.
Loss of your chicken flock is not something to joke about, and is extremely upsetting, as the Marsala family indicate in their video. Chickens become more than just an investment in egg production, they are often a part of family life and each chicken has its own individual personality which endears some of them more to us than others.
Options for chicken runs do run the gamut in square footage, size and roof styles. Large or small is probably better than none at all. And the covered area provided protection from overhead predators and neighborhood dogs and roaming wildlife.
Selection of the best chicken coop includes consideration for the outdoor activities of its residents.
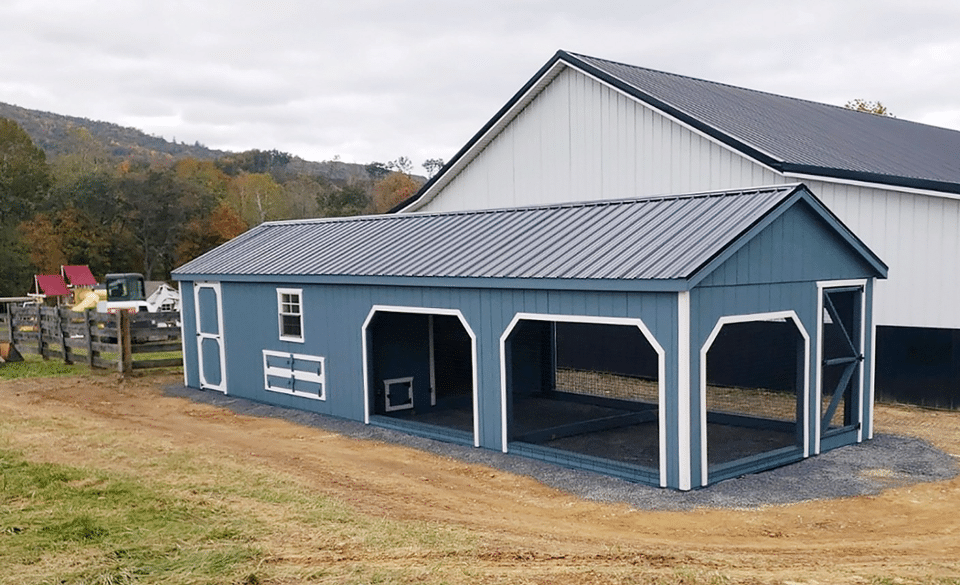
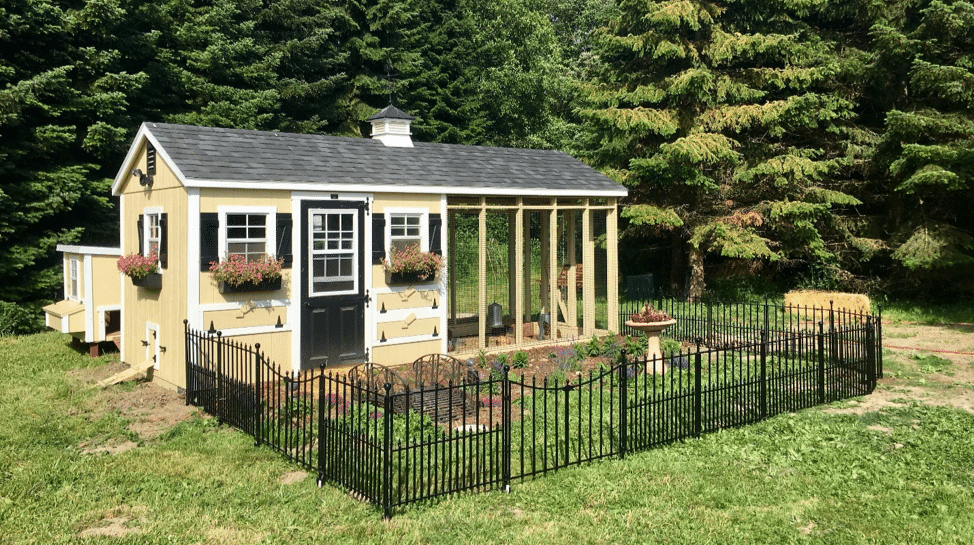
Full customization of a chicken coop that includes a built-in run is available at Horizon Structures. From human height access doors for easy caregiving duties to large (4’, 5’ or 6’) to wire floor runs and color options to ensure the coop complements existing structures on the property, the array of choices is mind-boggling.
Interaction with wild birds is much less likely when the chickens are secure in their own run. They are also less likely to have an unwanted interaction with a car or other motorized vehicle or wander off to lay eggs where they won’t be found during egg collection time by the caregiver.
With the increasing prevalence of avian flu in the U.S, it may be time to consider a coop with a build in run. You can shop the lot if you want one right way, or place and order and have it delivered to just the right spot in your backyard.
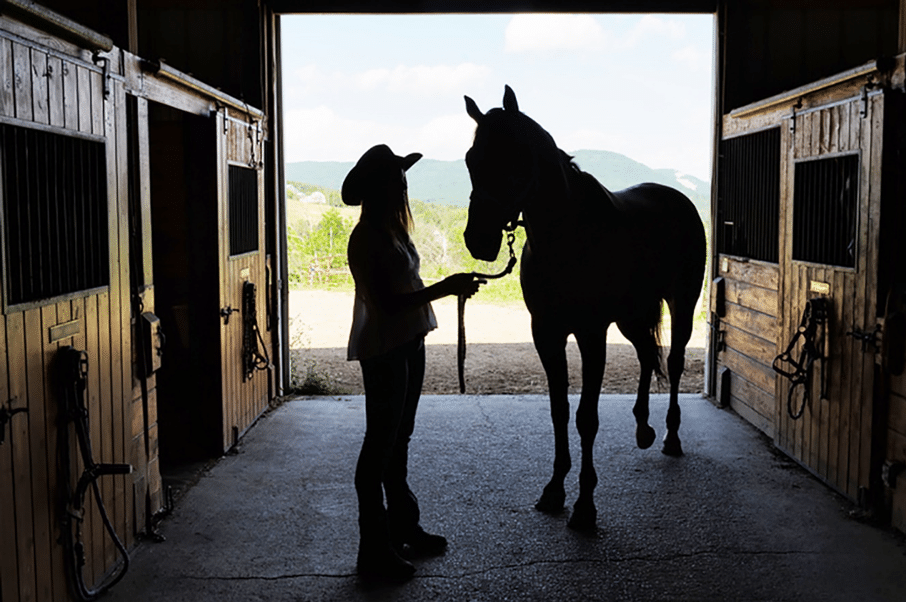
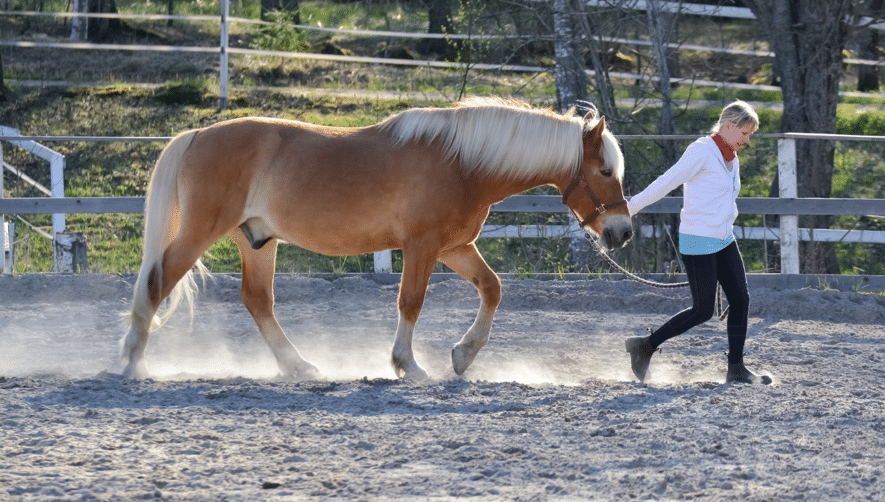
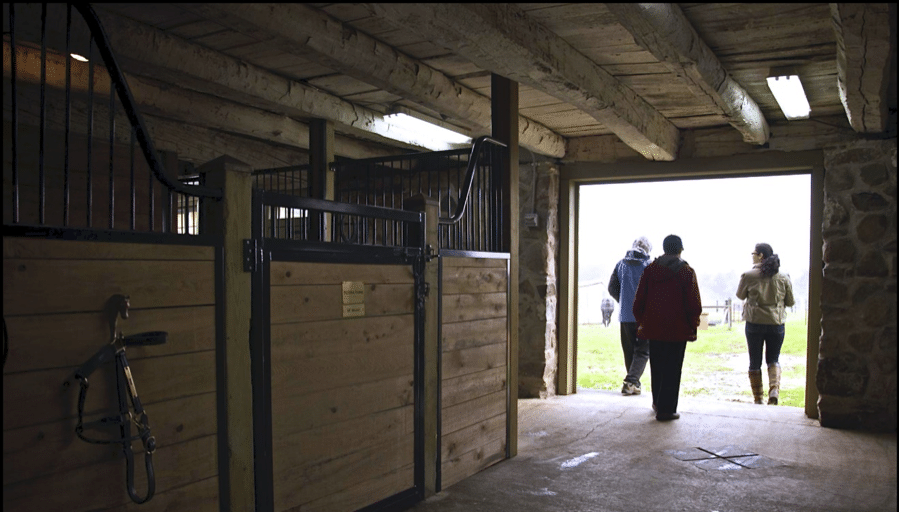
The care, custody and control responsibilities of working with horses usually includes handling the noble beasts in confined spaces. Daily duties often include leading the horses to and from pastures to the shelter of a stable or horse barn. Whatever the design or style of horse housing utilized, there are many opportunities for accidents to happen that can result in minor or major injuries to horse or human.
Accidents are defined as unexpected events that are not intended but that cause damage or injury. Horses are large, unpredictable creatures of flight so horse trainers/owners/handlers should truly learn to ‘expect the unexpected’ and be proactive in accident prevention.
Sadly, every year many injuries occur that could easily have been prevented with the use of a few simple training techniques for horse and handler. It is not just the neophyte horse owners or caregivers that cause preventable injuries. Often knowledgeable and experienced horse people are lulled into bad practices and become casual in their handling habits regarding their equine charges.
Remember every time you are in a horse’s presence you are teaching it something. Make sure it is something you want it to learn.
The practice of opening the pasture gate and allowing horses to move freely to their barn stalls either ‘en masse’ or individually may seem fun and be quicker to do than taking the time to halter the horse(s) and lead them to the barn, but such actions can also result in horses becoming injured.
Arguments can occur between horses as to who has which stall, inadvertent kicks can cause injury to horses/humans and damage to property, horses can hit their hips entering the stall in a rush etc.
Additionally haltering and leading a horse is a valuable training opportunity.
Here are 5 safe horse handling tips that when consistently implemented may help mitigate the risk for injury to horse and human:
The Simple Stop
It may seem simple but the ‘stop’ offers a significant safety benefit when leading the horse in and out of the barn. Teaching your horse to halt when being led on a halter with the rope is easy to do. Safety caveats include:
Never wrap the rope around the hand or fingers or drape it over your shoulder as a sudden movement from the horse could cause significant injury.
The habit of throwing the lead rope over the horse’s back as it enters the stall alone while the handler stands back can cause injuries such as rope burns to the horse should the rope fall to the floor and the horse step on it.
Ensure the horse’s halter is properly fitted. The noseband should be placed 1” below the cheek bone. Both the noseband and the throat latch should be a snug enough fit to ensure the halter won’t come forward and over the horse’s ears should he back up or come off under the horse’s chin if he rears up or pulls back.
If a lead shank is used instead of a rope, it should not be looped through the halter and clipped back to itself. This could result on a horse stepping a hoof through the loop in the chain if grazing or dropping its head and cause the horse to panic and thus result in serious injury.
Training Tips:
Voice commands should always be used in addition to rope tugs that exert pressure on the noseband of the halter.
The use of the word halt, or whoa, given in a commanding voice in a low tone combined with a light pull and release of the rope is all that should be needed to halt the horse. Remember it is the release that teaches the horse not the application of pressure.
The handler is at the shoulder of the horse and stops alongside the horse at the same time. The horse can be rewarded with praise and a pat on the shoulder and then asked to ‘step up’ or ‘walk on’.
After training test the horse’s understanding of this very basic task by using just the verbal command i.e., the handler walks forward a few steps after issuing the halt command and stands still while asking the horse to step up or walk on.
Eye contact made at the time of the halt and then released when asking the horse to step forward can also be employed.
Should the horse not understand or respond to the halt command it is important not to start a tug of war on the rope. Simply walk forward a few steps and ask again. Eventually the horse will ascertain how easy it is to comply and seek the positive reinforcement reward.
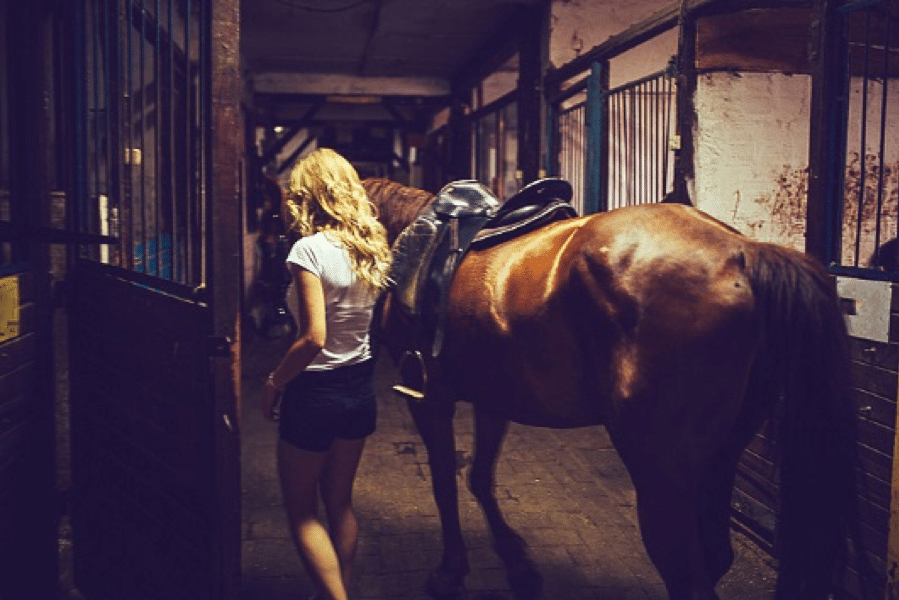
The horse should always be halted before being led into a barn, before being led into or out of a stall or through a doorway to an indoor arena.
This gives the handler the opportunity to ensure there are no obstacles such as tack boxes, skips etc. other horses, pets, children, adults or vehicles blocking or impeding the safe passage of both horse and handler through the door, along an aisleway, or in the stall space.
Horses’ vision is not the same as human vision and does not adapt from light to dark in seconds. It can take more than 30 minutes for a horse to transition to full vision when going from bright outdoor light to the relative darkness of a barn.
During snowy winter months, halting a horse before entering the barn also gives the handler time to garner help to pick snow from the horse’s hooves that may have balled up during cold weather.
Removal of these ‘snow angels’ on barefoot horses or ice/snow packed in shod horses’ feet before attempting to traverse a rubber matted or concrete aisleway will help prevent the horse slipping thus minimizing the chance for soft tissue injury that is especially likely when making a sharp turn into a stall. This precaution may even prevent a horse from going down altogether and fracturing bones such as the pelvis.
Handling Hack: As a seasoned horse trainer I additionally train my horses to mimic my ‘walk like a penguin’ action inside and outside the barn when a covering of snow or ice is on the ground. Taking these ‘little steps’ lessens the likelihood of the horse and myself skating around.
The use of the halt also enables the handler to ensure they are safely placed in optimal position just in front of the horse’s shoulder to step into a stall in advance of the horse and guide the animal through the center of the door entrance. This will help ensure the horse does not bang his hip on a side post which can cause injury or even permanent damage and reduces the risk of a blanket catching on a door frame or stall door latch.
When leading a horse into a stall or paddock it is always wise to take the time to turn the horse around so that it is facing the entrance with the handler at its head. Not only does this eliminate the opportunity for the horse to duck through a door or gate and escape the pasture or stall, but it also minimizes the risk of injury for the handler at the time the horse is released.
It is usual to remain on the inside of the horse and turn him around the handler keeping his head toward the handler as this swings his hind legs away from the human and makes it easier to maintain control. Remember wherever a horse’s head is pointed he will most likely follow.
Horses may also be taught to turn around or move over in the stall when the stall is being mucked out. The use of an intermittent tap on the horse’s girth area together with a verbal cue of ‘move over’ and praise reward when the horse complies, (especially when the horse may be eating), should be trained in the horse from an early age.
Move the horse’s feet to control its mind.
Halter Head Drop
Horses of many breeds tower above humans particularly when they are excited such as when being turned out, feed times etc.
Whenever the horse is to be released either by unclipping the rope and leaving the halter on the horse or by removing the halter, it is more easily and certainly more safely completed if the horse is taught to drop its head for the process and to wait for a verbal cue before turning away or leaving.
Safety note: Always remove halters for turnout if equine hay feeders are present in the pasture to prevent the halter becoming hung up on unnoticed protrusions. Water buckets and hooks in a stall and blanket hardware incorrectly adjusted with the outer edges of clips facing outward, can pose a similar hazard.
Handling Hack:
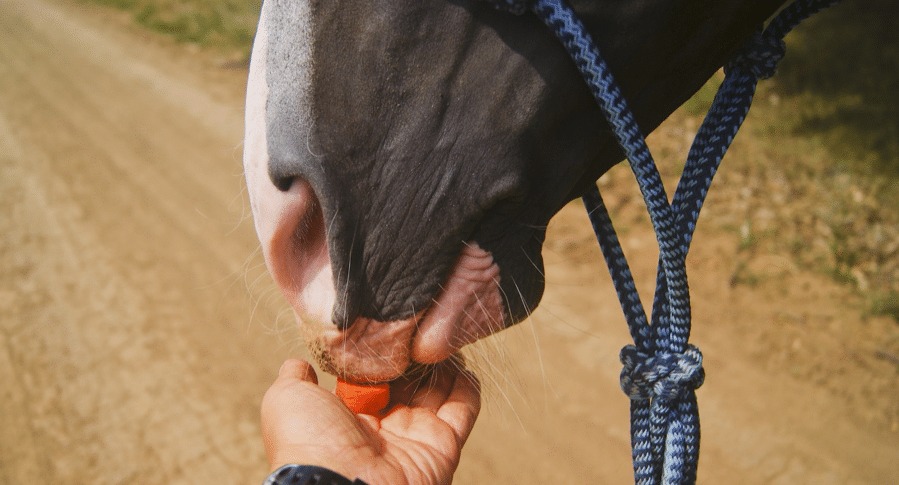
Food rewards should be carefully used in training so as not to teach the horse to nip or search for treats every time he is handled. I use carrots as a healthy treat whenever placing a halter on a horse or removing it. The carrot is easy to see and smell from the horse’s perspective and is unlikely to be dropped. For safety, if it does end up on the ground don’t reach down to get it, let the horse pick it up.
I give the thinner half of the carrot as a reward for dropping the head after the horse has patiently waited for me to buckle up the halter and clip on the rope, and the second half after the halter is safely removed.
The time it takes the horse to chow down on the carrot allows extra time for the handler to leave the paddock or stall safely and its size minimizes the risk of the horse finding my fingers instead of the treat if it is excited.
Bubbles and Backing Up
All horses should be taught to respect the ‘bubble’ or immediate space around their human handlers. A horse should also be trained to back up on command. The latter facilitates more control for all sorts of life events, such as trailering and transport, extricating a horse from a hazardous situation such as entanglement in a fence or gateway etc.
Backing up a horse is also used to instill in the horse who is in charge. Horses in a herd will back up away from the leader if challenged, and similarly the human handler can use backing up to teach the horse who is ‘the boss’ without ever needing to touch the horse.
Whenever a caregiver enters a stall, the resident equine should immediately turn to face them and then back away on a verbal cue to allow space for the handler to enter the stall.
Training Tips:
Use of a whip acts as an extension of the handler’s arm when training. Train the horse to be unafraid of the whip before beginning, by passing it along his shoulders and flanks. The additional distance from the horse that a whip provides offers more safety to the handler during the exercise.
As with all training cues keep them consistent and allow time for the horse to comply. Begin with a physical touch to the horse’s nose pushing it back toward its chest with the hand and tapping the point of the horse’s shoulder with the whip asking it to ‘step back.’ Reward compliance with a praise reward.
Rhythm is important in all horse training. Taps given in a predictable rhythm will relax the horse. If the horse overreacts then the impact of the tap was too much, if he does not react at all then the tap was not hard enough. Don’t be aggressive, be assertive.
Stop tapping and offer the praise reward immediately the horse positively responds, but don’t stop tapping until some effort in the right direction has been made.
Reward even the tiniest of movements or efforts from the horse in the right direction. Backing up is a hard task for a horse to accept as he cannot see directly behind him.
If the horse doesn’t immediately comply you can tap the near front hoof with your foot to tell it to move the hoof back.
Always stand to the side of the front of the horse, not directly in front when training unless you are an experienced professional.
Once the horse understands the instruction, you can migrate the cue to holding your hand up as a ‘stop’ sign while still using the verbal cue and moving your hand toward the horse as if pushing an invisible wall, or you can simply use your arm to point and direct the horse using it like a whip.
Tying and Cross Ties
There are many different methods utilized to teach the horse to stand tied up or on cross ties. Whichever method is chosen, it all begins with teaching the horse to stand still.
During a horse’s life it is inevitable that it will need to be restrained at some juncture by being tied up. Trailer transport, cross ties utilized for tacking up and grooming, standing tied to a trailer at a horse show etc.
Horses that pull back when tied can easily panic and injure themselves or others. It is important that the horse has been trained to step forward when pressure is applied to the halter rather than step back, before teaching the horse to tie up.
As with any other training of the horse it is the release of pressure that teaches the horse the best course of action, not its application.
Be aware that foals are particularly prone to damage to the cervical area of their spines (this is one of the reasons most horse breeders choose to use pressure from a rope behind the foal as well as a halter rope in front when teaching them to lead), so special care should be taken to train the foal. Tying up is one of the last things to teach a foal, and it should not be done until the horse is at least 6 months old and weaned.
Patience poles/snubbing posts are mostly used as a punishment, and I do not personally advocate their use.
Whatever method is employed, opt for ones that are kind, safe and offer a positive experience for the horse.
Remember to always stay out of the kick zone when training a horse to any task.
Take Home Message
Horses are amazing creatures. Their noble natures and smart intellects make them great partners in life. Keeping both horses and humans as happy and safe from injury and damage as possible is always the goal.
The horse’s amiable disposition allows it to trust its human counterpart, but this also exposes it to risk of abuse. Always honor the bond of trust and do everything to ensure it is built upon every day.
To quote one of my husband Paul’s (who is also a GP trainer/clinician/competitor) favorite expressions when teaching students to train their horses:
“Just Because You Live In The Sticks Doesn’t Mean Your Barn Has To Be Stick-Built.”
While the advent of Spring is the perfect time to get busy with plans laid dormant through winter months for a new horse barn the reality is any time of year is a good time to get busy with the new horse barn project.
The trouble is no matter what the season it is hard to find the time it takes to visit prospective barn builders, sit down to discuss all the upgrades and available options and gain a perspective on all the choices and price points out there for a brand-new beautiful horse barn. Horse owners are often juggling busy lives with multiple demands on their time and energy hitting them from all directions.
Add to the time management issue the cost of fuel to undertake the seemingly necessary drive time and make these trips, and the dream of the new barn may seem a long way away.
Thankfully, modern technology offers a viable alternative scenario where the prospective barn buyer can choose the perfect barn to fit their needs, wants, and budget from the comfort of their own home and on their own schedule.
Just because you live in the sticks, doesn’t mean you have to buy a stick-built barn with all the hidden costs, budget overruns and blind trust that the result of the spend of your hard-earned money will meet or exceed expectations.
The advent of 3D building technology offers the buyer a visual opportunity to enjoy a ‘real feel’ of the horse barn with 3D renderings that can be customized to suit any individual’s taste.
Utilizing 3D technology, buying decisions can be made in peace and quiet with opinions for all parties involved in the new barn project heard. Conflicts in time schedules for different family members or business partners to weigh in on the topic are negated, and the buying experience is fun and exciting. No more need for dreary drives with tired young children arguing in the back of the car or rushing home to feed the waiting horses or pets. No more need for missed rides or income earning lesson opportunities. No more need for barn buying decisions made blind with the only visualization of the final barn on paper or in the mind’s eye of one person.
Another useful tool that offers great insight into the ‘feel’ of a horse barn are virtual tours. Once you have taken a few virtual tours of different styles of barns, you may find yourself rethinking the design of barn you want. For example, a virtual horse barn tour of a high profile barn that is 36’ x 26’ may perfectly fit your present needs, but if you take a virtual tour of a low profile 36’ x 24’ barn you may find that for much less spend you would be very happy and a compromise could make the difference in buying now and having your horse home now. Especially as low profile barns can commonly be purchased straight off the sales lot and can be delivered right away, saving you livery expenses.
Yes, everyone is aware that construction company websites commonly offer a myriad of photo galleys and embedded video promotions of their business profile and building upgrade features. Keen resources exist online to answer general questions on barn building experiences and offer suggestions. Great options and a grand place to start.
However, if the ultimate choice of a new barn is to meet both their demands in functionality and aesthetic appeal prospective buyers truly need to do a ‘walk-through’ of barn designs and explore a wide world of barn styles, upgrade features, colors and construction methods such as timber frame versus modular.
Thus, in addition to the armchair planning options of sometimes mundane websites and social media promotions, it is wise for the prospective barn purchaser to seek additional methods of ascertaining just what they are buying and how the structure will work for daily use.
Spatial awareness is a huge part of architectural design. How a building is engineered, how it looks up-close, and how different structures will transform the atmosphere in a particular site or environment need not be left to chance.
Details of barn construction are easy to overlook if you are not experienced in the variety of engineering and carpentry applications are available. When you enjoy a virtual tour, you can see what makes one barn construction method different to the next. For example, you may not know what a timber frame barn looks like and what makes it so special, aside from hearing tell of traditional mortise and tenon joinery and how it is the strongest form of joinery carpenters use, even in this modern world. A quick tour of a timber frame barn will show you how the beams look. You will see almost first-hand how aesthetically pleasing the timber frame option actually is, and if you are trying to be sensitive to the historical charter of the property you own the timber frame will certainly fit right in.
Visualization of what the new barn will look like is an important part of the buying equation. It creates confidence in the ultimate decision making and allows flexibility in budget by addressing optional upgrades and changes in size and style without the expense of a ‘work order’ and changes on site.
Buyers should seek a construction company that encompasses a large variety of barn style and feature choices, siding and roofing options plus can deliver on the smaller details such as copper weathervanes and European stall fronts and any other facets of individualization that will make the barn unique. The 3D technology should offer measurements, good quality video resolution, and be easy to navigate and the Project Team Manager at the company should be fluent in making all adjustments to the program to accurately showcase changes and requests of the buyer.
The opportunity to save the drive and use 3D building technology to ‘build the barn’ from layout to loft heights, siding to stall size, color to cupolas and everything in-between is not to be missed. It is a great way to take control of the new barn building project and eliminate any unhappy surprises.
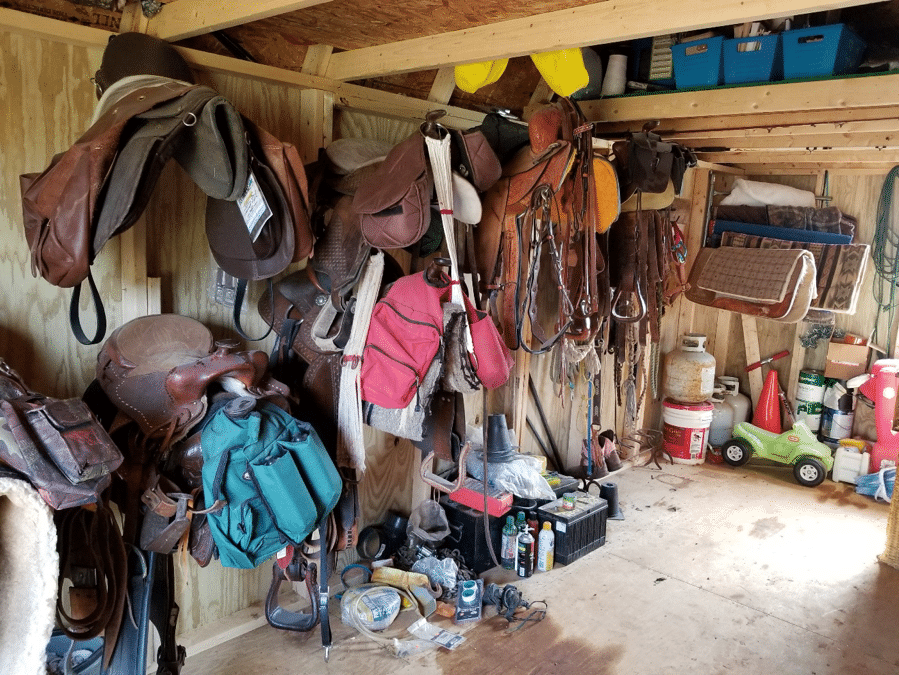
Guilty as charged! As a veteran horse owner, I am guilty of being a hoarder of equine tack and paraphernalia, inside the house and inside the barn and even the horse trailer dressing room has invited a permanent storage solution at times.
Just as handbags, jackets and shoes seem to have a magical attraction to many of us gals when shopping, saddle pads, bits, bridles, blankets and breeches also seem to inexplicably find their way home.
I confess that as a lifetime horse crazed person the accumulation of a ‘bit of a boneyard’ when it comes to everything equine-related may have occurred. If you have ever moved ‘farm’ you will likely have realized a similar situation.
Luckily, my hubbie is also an equestrian so the piles of neatly stacked saddle pads hidden in closets, drawers full of bits and spurs and cupboards full of every imaginable color of polo wraps goes for the most part anyway, without comment or complaint.
That ‘extra stall’ in the barn is commonly abused in use as a storage resource that was always planned to be temporary but inevitably becomes a permanent home for a litany of tools and equipment. Stuff that can be placed safely behind a bolted door beyond the reach of inquiring equine noses and pets’ investigations.
Horse stuff isn’t limited to locations in the tack room/office or barn aisleway either, our house is adorned with horse brasses, books and equestrian art, expressive horse themed rugs and even a hunting horn decorates the wall of the mud room. Brasses that require regular time-consuming polishing I might add. But I wouldn’t have it any other way.
As the renowned American interior designer Bunnie Williams would advise, your house should reflect your interests and passions. No problem there where most of us horse loving folks are concerned.
But in interior design and antique collection, there is another edict:
“Curate don’t collate”.
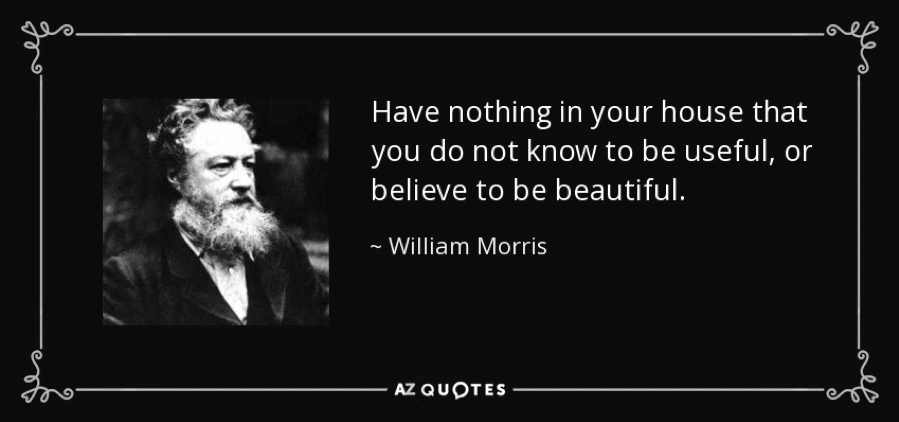
Good thinking. Following along with the interior design theme, to quote the then radical creative 19th Century anti-maximalist William Morris:
The same could be said of the horses’ house.
Stacks of old hay could be sold to a local cow or pig farmer; unused tack trunks and collapsible saddle racks could be removed; aged health care products could be discarded; and more than likely equine tack and equestrian apparel supplies will yield a horde of horsey stuff for sale.
Spring cleaning the barn is a great opportunity to take a hard look at the hoarding habit. Make the decision to stop wasting time all season long sorting through masses of old ‘just in case I get a new horse’ paraphernalia, cleaning leather tack that you will likely never use again and turn unused ‘stuff’ into hard cash that could be productively used for further horsey pursuits.
Proceeds from the sale of ‘stuff’ could fund the fees for a show or clinic event, pay for your daily use saddle to be restuffed or refitted to properly fit your horse or even buy a new run-in shed.
Here are some thoughts to help inspire your barn and stable cleaning and a few hacks to help the process along:
Don’t Clean Old Tack Before Selling
It goes against every rule of horsemanship to leave tack dirty. Weird as it might seem, buyers often prefer to ‘recover’ items to their previously pristine condition rather than purchase them looking ‘as new.’ Antique buyers are commonly similarly afflicted with the notion that they have made a ‘find’ if the object of their attention is in ‘weathered’ condition.
Regarding equestrian clothing, you would expect that unwashed clothes, stained shirts or bleach marked breeches would be unloved. In the ‘second-hand’ market of recycling, the usual marketing techniques for presentation simply don’t seem to apply. All manner of wrinkled, unkempt apparel items appear across Facebook Marketplace and similar venues and sell well.
For some of us the notion of presenting any uncleaned item or one in poor condition is understandably abhorrent. The best rule is to consider where the item is being marketed and the target audience of the product.
The Perfect Price
There is no such thing as the perfect price. You will know if the price is right however, because the product will sell. The dynamics of the free marketplace do not lie.
Many of us become emotionally attached to a late horse’s bridle or equipment, or a horsey gift that a beloved relative bestowed upon us. This often translates into asking an unrealistic price for the object. Options such as donating rather than selling the item can make us feel better and even taking a photo to remember the item can help alleviate the angst we feel at parting with it.
The reality is, that Arts and Crafts designer Morris’ advice holds true throughout our curation of horse tack, tools and equine and equestrian apparel.
A great example is the saddle pad collection. Over time technology has changed the saddle pad from a simple piece of cloth designed to keep the underside of the saddle clean to fabrics with special features such as anti-sweat, compression and shock resistant components and a myriad of other improvements. Through increased attention and knowledge of equine anatomy and saddle fit for both horse and rider, the design and purpose of the saddle pad has evolved.
While natural sheepskin and other ‘older’ favorites such as 100% cotton, may still be preferred by the die-hard traditionalists, and bright colors and bling be dismissed from the wardrobe of the more reserved horse person, the likelihood is that many of the saddle pads stashed in the stable yard go unused and are unlikely to feel the warmth of your horse’s back again.
Remember, the perfect price is the one that someone will pay for the item.
Expect to discount the price especially if the item does not sell quickly. Just as retailers offer markdowns as time progresses and the products sit unsold, it is smart to discount the pricing to save your valuable time and effort relisting.
Curating the stack of saddle pads into those you really use and selling off those that you don’t is more than a good fiscal idea. A good clean out is good for the brain.
The less ‘stuff’ you have impeding your visual cortex the more organized you will feel. This does not mean it’s a grand idea to just ‘stuff the stuff’ away in a cupboard. You know it’s there and its presence makes finding something you need more time consuming.
Humans feel more rested and more in harmony with their surroundings when the environment is clean and organized. I’m not sure what our horses think on the stable cleaning subject but I do know that when we are happier so are they.
Don’t Get Taken For A Ride
Scammers and con artists abound. Use common sense when marketing your horsey stuff for sale. If an offer sounds too good to be true it probably is and it is essential you do your due diligence and are aware of the common scams that are present, especially online.
As summer approaches, many people are starting to make their summer vacation arrangements. However, in the meantime, instead of daydreaming about how your vacation will be, you could have an early one right at home. How – you may ask? Well, we can tell you how to create the perfect backyard staycation. We have some fantastic ideas that we would like to share with you in this article. Furthermore, you may pick which structures are the best match based on your outdoor lifestyle and have your own backyard oasis. So, let us see how you can come up with the perfect backyard staycation ideas for you and your dogs.
Install a pool.
A great way to spend time outdoors, especially when it gets warmer, is by the pool. Furthermore, owning a pool does not require spending a large amount of money. On the contrary, you can have an inflatable pool or a stock tank. Even if you can’t swim as you would in a large pool, you can still enjoy spending time in the refreshing water.
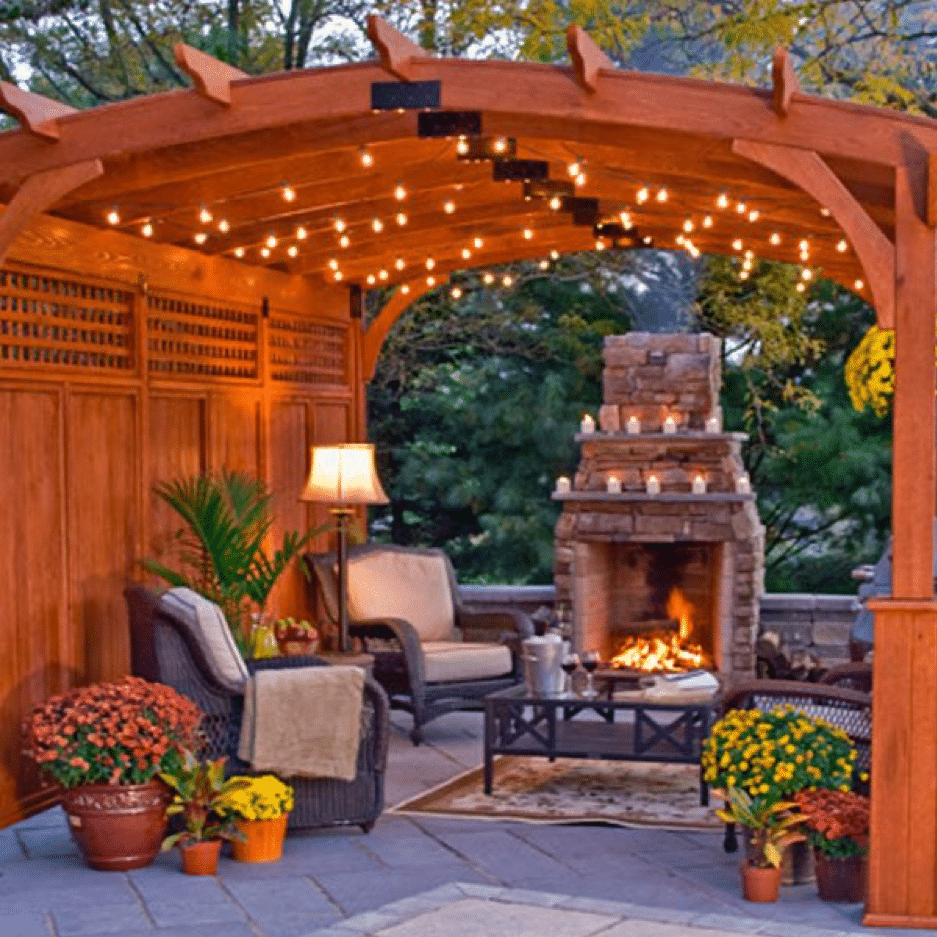
At the same time, if you already have a pool, you can upgrade it. You can add a covered area near it, such as a lovely pergola, and furnish it with seating selections. With a few seats or wooden benches and a coffee table, you will have the ideal spot for socializing with guests. For staying in the water, you can have some pool floats. You can read a book or float on them while sipping your favorite cocktail. Now, that is what we call a fantastic backyard staycation.
Assemble an outdoor kitchen.
During hot days and evenings, everyone prefers to spend more time outside. And the best part is that you can do almost all of the activities in your backyard, including cooking. All you need to do is to set up a summer kitchen. Set up a dining space, bring out a grill and a cooler, and you are ready to go. If you want a kitchen that you can use all year, get kitchen countertops with a built-in refrigerator and a gas grill. In addition, you can make the kitchen area even more delightful with a bar. It will be the ideal setting for you to showcase your bartending abilities to your family and friends. Simply ensure that these constructions are sheltered from the elements and place them under a gazebo. That way, you will still be able to spend quality time outside, even if it’s a rainy day.
Create a relaxation corner.
One of the reasons we go on vacation is to disconnect and relax. However, until you can go on that vacation, improvising something at home can work. For instance, you can create the perfect relaxing staycation right in your backyard. Find a peaceful corner of the yard and convert it into a relaxing oasis. To transform your backyard, place a hammock between two trees, build a small water fountain, plant some grass and flowers around it and create a beautiful space for leisure. You can even bring out a speaker and play relaxing or meditation music. Also, if you practice yoga, this will be the perfect spot to get in touch with the elements. Exercising on the grass near a fountain will bring you joy and inner peace. This corner might even become your favorite place in your backyard.
A hammock can be a great addition to your backyard staycation.
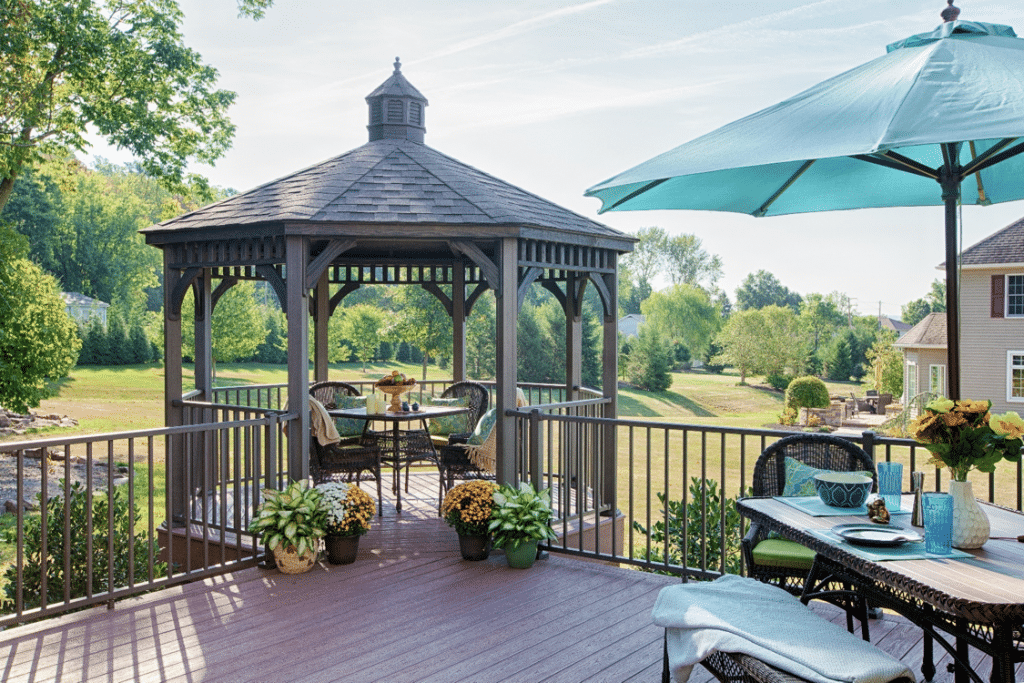
Put your deck to use.
If you don’t want to make changes to your yard or don’t have the space, but you do have a deck, put it to use. Decks can be transformed into spaces for relaxation, socializing, or dining. Based on what use you want to assign it, choose the right outdoor furniture and accessories, and get creative with the design. A swing or a rocking chair, a small bookcase, and a table, for example, can be used to create a reading corner. If you often host game nights, you can put together a table with enough chairs and a trunk that can serve as storage space for your favorite board games. Also, during chillier evenings, you can bring out pillows and blankets and make the place cozy and comfortable. All your guests will be delighted to spend time outdoors in such an inviting space.
Make the backyard fun for the whole family.
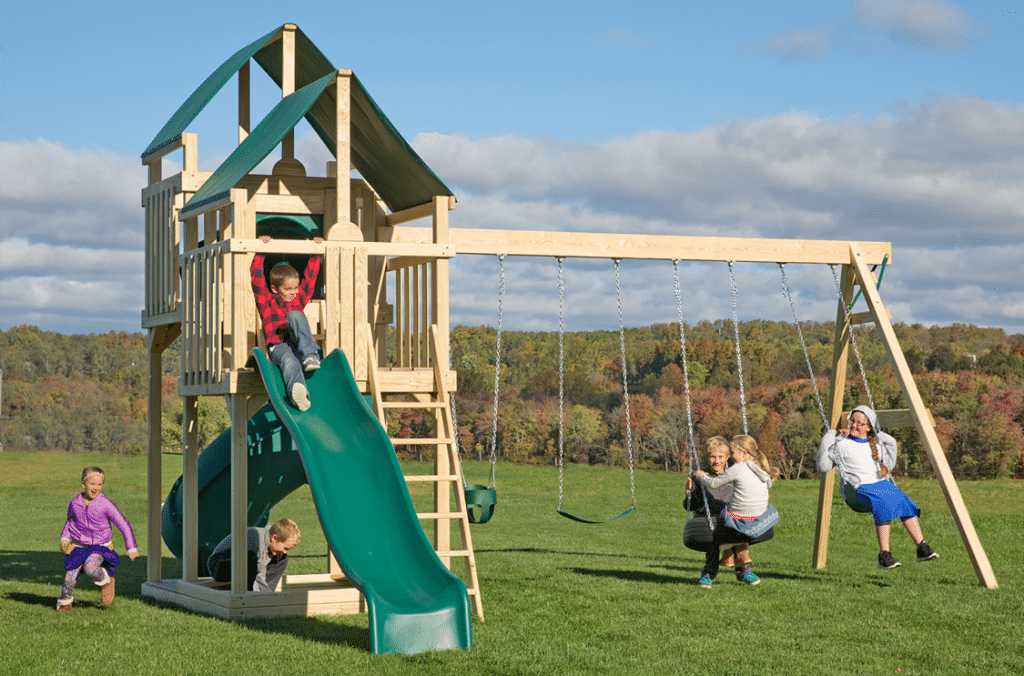
If you have children, you take them with you on vacation. But if you aren’t leaving your home for that vacation, you can bring it to them in your backyard. After all, your entire family could benefit from a staycation now and again. As a result, make a play space for your kids in your yard. You can set up a swing, make a sandbox, build a treehouse, or a playhouse. In addition, if your kids like spending time in the water, you can set up an inflatable pool or a lawn water slide. Just imagine all the fun your kids will have every day.
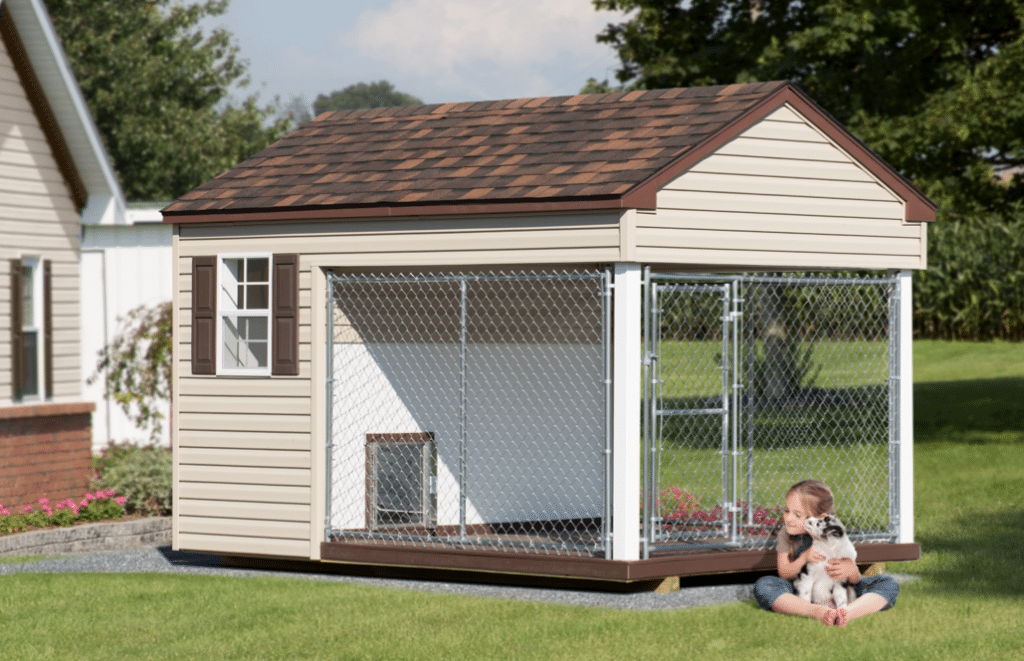
At the same time, we mustn’t forget about the other members of our family that could also use the outdoor space of their own. Our pets need pampering every now and then, and an outdoor kennel can be just what they need. A kennel can be a peaceful, comfortable, and shady area where dogs can stay cool on hot days. Just make sure that you choose the right size for your pet’s kennel, and he will have the perfect place of his own.
Use light to dictate the atmosphere.
To create the perfect backyard staycation, you also need to think about summer evenings and nights. Spending time outdoors on a pleasant evening can be a great way to relax after a long hot day. So, why not use lights to make your backyard that much more enjoyable in the evenings? You can use hanging lights for the trees, fairy lights on the poles of the wooden structures, and solar lamps by the walkways. That way, you will have enough light to see and do activities in the backyard at night. Additionally, consider adjustable lighting to control the brightness or hue of the lights and create different atmospheres. And if you want to create a more intimate and inviting ambiance, go with candles.
A well-lighted gazebo can be a wonderful place to spend time during your staycation in your backyard.
Final words
As you can see, you can easily create the setting for the perfect backyard staycation. All you need is a vision for your backyard and lots of creativity. But if you lack inspiration, try putting some of our ideas into practice.